Spruce up your Stand Mixer - Polka Dots
- Katie V.
- Feb 26, 2017
- 7 min read
I consider myself a pretty lucky gal, especially since I have some pretty amazing women as role models, both in life & in the kitchen. My Gram was a huge part of my life, and when she passed it was (and is still) an indescribable feeling. It felt right that my first blog post should honor her. Her & her sturdy white stand mixer that I was lucky enough to inherit. I never thought myself in need of a stand mixer, until I got one. I say this all the time, I am a COOK, not a baker. There's a big difference in my mind. But once I got this baby my life changed for the better, you don't realize the freedom of moving around the kitchen while it does all the work for you. Plus, every time I use it I am reminded of fond memories with my Gram.
My gram has owned this stand mixer for awhile & I thought it needed some freshening up now that it was mine. New home, new look! She put it to good use, and I have too for the year I have already owned it, so it was a little grimy. Plus, I'm not much for white, I'm way to messy for that. So, I did just like you and started researching from people who had already tried this idea. The best blog I found, and my inspiration was over at apartment therapy, check it out if you want double verification that this process works, I added her link below.

First off I had to convince myself to start a project. I have a lot of confidence in my abilities, until half way through when I'm failing and The Hubs steps in to boost my spirits. This happens often.
Anyways, off I went to the hardware store and gathered my supplies, the hardest part for me is always the spray paint aisle. So many amazing colors and choices, and I had no idea what I wanted. I settled on this pink champagne and it turned out beautiful. Plus, it's a lighter color so I can easily cover it next time I want to do this. The Hubs convinced me to do polka dots, which after spray painting it I couldn't sleep thinking I should have left it classic ... but now that it is finished, I think it turned out really great and it is personalized. Definitely took some extra time though.
Here's what you need for this project:
Spray Paint
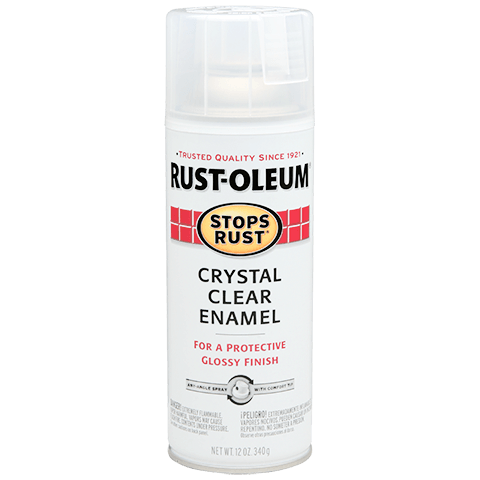
Enamel gloss protective spray paint
Painters tape
Screwdriver
Multi- purpose cleaner
Paper towels - Rags
Tooth picks
Sanding Block - 100 or 120 grit
For Polka Dots
Color coding label
Exacto O Knife
Rubbing Alcohol (or goo gone)
Q- tips
Disassemble and thoroughly clean your mixer. Of course I had just made pizza dough, when I got the motivation to start, hence the flour all over my counter. Also, I didn't know I was going to start a blog. So I have very minimal pictures, I will get better. See the close up of that grime, by the metal band. Yikes! I used an all purpose cleaner, it's from the Dollar store and it works great. It has de-greaser added too, which helped. Here's what it is, but it's at the dollar store, so buy it there http://www.lastotallyawesome.com/shop/all-purpose/awesome-all-purpose-concentrated-cleaner-24oz/

Disassembly
I took everything apart. Remember to take pictures, so you can remember how it goes back together ... I'm talking from experience here. Since I had no pictures, it took a little extra time.
- Accessories port - unscrew the black screw and remove the silver plate then just tape it off.
- Metal band - that says Kitchen Aid, there are two little screws at the back that keep it in place, unscrew those and remove. Be ready to be shocked there is going to be some seriously nasty build up in there.
- Beater attachment - I just covered that(and the metal band) with a bag and taped if off. To clean the grime at the top of it, I used a tooth pick and a paper towel.
- Bowl plate - I unscrewed the the screws and removed it. You could easily tape it off it you'd rather
- Control knobs - For Speed and Tilting, I covered and taped them off
- Back Panel - I removed the screws and covered the electronics. Then I spray painted the cap separately
- Cord - wrap this sucker up. Experience here, I thought I wouldn't paint it, but when I was actually painting I didn't even consider it. Paint thinner will work if you're like me and forget though.
Cleaning & Polka Dot(ting)
Now clean. Using a good multi surface cleaner it will clean up pretty nice. I used toothpicks to get into the small crevices, and just paper towels for the larger areas. Really, after you do this part, it might rejuvenate your mixer. I know I was shocked at how much it needed a good scrubbing. So, you could just put everything back on and wait until it's drab again .... But, that's up to you.
After it's all cleaned up and sparkly. Keep Reading if you're doing dots, or just skip down to sanding if you're keeping it classic. If you are going to do polka dots, be warned my process is not perfect and I had some uneven ones.

For the polka dots, I went to the store and in the office supplies section picked up these babies. You know, the tags at almost every garage sale you've ever been to. I just watched tv and stuck these all over my mixer, no rhyme or reason. Feel free to be more calculated if you wish. ** In a few of my finished dots, the green ones left some residual color, no big deal but just not as bright white as some of the others. Don't use the green, if you read this in time. I was able to clean it up with rubbing alcohol, but since you're learning from my experience, that is my advice. Save the green for another day **
Once you feel like you have applied all your spots, it's time to sand everything. ** We sanded directly over the dots, which made them a little more difficult to peel off, since they were more warn down. If you can avoid it, just sand close to them but around as best you can **
Sanding
I used an angled sanding block (120 grit), that had an edge I thought it made it easier. You get whatever works best, but keep it about 100 - 120 grit. The tip from Apartment Therapy was to just get rid of the shine. You aren't trying to get rid of the color, just the sealer the manufacturer used. You'll be able to tell, just make sure it looks dull pretty much everywhere. Then give it one final wipe down to get rid of all the dust from sanding. I brought my blow dryer out and used it, that got ride of most of the dust, then I just whiped it down.

You can see how I taped off my mixer, and used bags on the areas I didn't want to deal with.
Near the bottom right you can see the cap (that covers the electrical). I put a piece of tape over all those little holes.
You can see on the front, at the base where those polka dots are pretty warn down from the sanding. Those were more difficult to get off. They were stickier than the others too.
Also, this was the part The Hubs had to step in because I was unsure ... but he lifted my spirits and we kept going.
Painting
I did this in winter ... in Wyoming. So I had to get a little creative. Most of you probably know that spray paint doesn't like the cold. I did this in my unfinished basement, on sunny days with the door open and fans going after spraying. If you want to wait until nicer weather you wouldn't have to worry.
Light, Thin Multiple Coats - this is the secret to spray paint. It doesn't take long to do one coat, so let it dry for 15 minutes in between and you're good to go again. I only needed two coats, but I had planned for three. I let it cure over night, because I was sleepy so I went to bed. You would only need an hour or two before you could add the enamel.

If you did Polka Dots remember to remove them before doing your enamel coats. I used an exact o knife to get them off. I just stuck the blade under an edge and kind of popped it up. But whatever works best. Be warned, there is possibilities of uneven edges. If there was some residual stickiness I just cleaned it up with a Q-tip dipped in rubbing alcohol and it came right off.
Now spray the enamel. Same concept here - Light, Thin Multiple Coats - Remember when we sanded the shine off, this is going to bring it back and add protection to the spray paint. That way it doesn't chip or ding.
Curing = drying + hardening
I left my mixer in my basement & let it cure for a week. When I was researching, others said 48 hours is enough time, but I wanted to make really sure. Everywhere I painted wasn't a surface that will touch any food, but I figured better to be on the safe side. Yes, I did need my mixer multiple times, but I just used the hand mixer. You almost forget how nice having a stand mixer really is.
Once it has cured, wipe it down one last time & then it's ready for use. Check out my Fluffy Scratch Waffles, if you are in need of a new recipe to use your stand mixer for.
Here are the paint products I used. The white of my polka dots is my original mixer color.
That was my process, and I'm thankful to The Hubs for the polka dot inspiration. I do love the way it turned out, totally worth the extra effort. Now it sits out on the counter, and I smile even more every time I see it. Another bonus, because these things are heavy! So it's nice not to have to get it out of the cupboard for every use. Let me know what you think, or if I can help with any questions. Check back soon, I'm always up to something. Enjoy Life!

Here's the post I used for inspiration.


Comments